
Let's Get Fresh: Be a Kid Again: DIY Soil Blocks
By Bob Workman on January 11, 2015 from Let’s Get Fresh via Connect-Bridgeport.com
Bob’s Note:Happy New Year, Loyal Marketeers! During the winter season in Let’s Get Fresh we will be focusing on what farmers do during their off-season. Hint: they aren’t vacationing in the tropics all winter. Not when there’s work to be done! This month we are featuring my good friend Keith Finger as our guest blogger. Keith is one of the many colorful characters that make up the vendor roster at the BFM. Along with his wife (and boss) Kim, Keith runs Mountain Momma Organics in Macfarlan, WV. Your quiz for this month is to try to find Macfarlan on a state highway map. Good Luck!
By Keith Finger, Farmer at Mountain Momma Organics™
Spring is just around the corner, so it’s time to finalize your plans for your Spring garden. In this article I’m going to introduce you to an inexpensive, efficient, and eco-friendly way to prepare and grow your own healthy seedlings using soil blocks. These days many people purchase seedlings from chain stores or garden centers, but who knows the cultural misfortunes these plants have suffered through: Overwatering, lack of air movement, not enough sun, over-fertilizing, chemically and biologically contaminated soil, etc. Is it any wonder that many of our purchased transplants suffer from blight and other maladies? In addition, all of those one-time use polypropylene containers make for a massive amount of landfill waste each year. So let’s talk about growing our own seedlings using soil blocks. It’s simple, really enjoyable, and will help ensure your family is eating healthy food by starting with healthy plants.
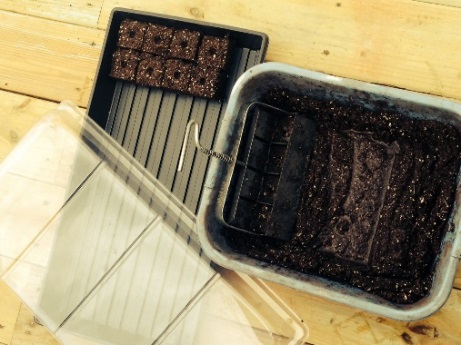
What is a soil block? As the name implies, a soil block is a cube of soil that’s created from compressed moistened growing medium. A 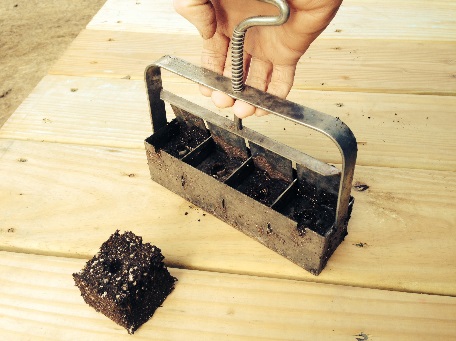 forming tool called a “soil blocker” is used to give the blocks their cubicle shape. Figure 1 shows a four-up soil blocker forming tool and a single soil block. Compressed growing medium is pressed out of the former and finished blocks are placed side-by-side on a flat tray and later seeded. Figure 2 shows the set up for making soil blocks including wash basin with block mix and reusable flat tray with cover. Air space alone forms the side walls of each block. I liken this process to making sand castles on the beach with a bucket of sand. When properly formed, soil blocks stay together and form a fantastic media for starting and growing seedlings.
forming tool called a “soil blocker” is used to give the blocks their cubicle shape. Figure 1 shows a four-up soil blocker forming tool and a single soil block. Compressed growing medium is pressed out of the former and finished blocks are placed side-by-side on a flat tray and later seeded. Figure 2 shows the set up for making soil blocks including wash basin with block mix and reusable flat tray with cover. Air space alone forms the side walls of each block. I liken this process to making sand castles on the beach with a bucket of sand. When properly formed, soil blocks stay together and form a fantastic media for starting and growing seedlings.
Advantages to using soil blocks: First off, soil blocks are really fun to make. It takes a bit of work the first time to collect up all the materials, but after that I assure you you’ll never use any other technique for preparing and growing seedlings. You’ll notice there’s no side support for each soil block. There’s merely an air gap between them. The air gap is probably the most important technical benefit to soil blocks. The air gap prevents root propagation between blocks and root circling within blocks which causes root binding. Roots from the young seedling radially and uniformly fill the soil block from the top down. Root tips that reach the air gap boundary go dormant and usually do not grow into the adjacent soil block. Later, when the soil blocks are directly transplanted into the soil, these dormant boundary roots are well positioned to rapidly propagate into the garden soil. All this adds up to less root shock during transplanting allowing plants to more rapidly develop a strong supportive root system. Another benefit to soil blocks is the incredibly high germination rate. We typically enjoy 95+% germination, and unlike store bought seedlings, we know our seedlings are healthy and chemical-free when transplanted.
 So how does it work? First you’ll need to purchase the soil block forming tool. This is a one-time investment. The block former should last a lifetime if properly cared for. Forming tools come in various sizes: ¾, 1-½ , 2, 3, and 4 inch. We suggest that beginners purchase the 2” soil blocker, as shown in Figure 1. These run for about $30 and are readily available and cost–effective through online stores. Formers come with various shaped center pins that create a dimple (or other specialty impressions) at the top of the block where seedlings are placed. You should make sure the soil blocker you purchase is set up with a “Seed Pin”. It is possible to make your own former, but the commercially available ones are quite reliable and provide consistent results. Next you’ll need to make up your blocking mix (growing medium). There are many “recipes” out there for blocking mix. Plain potting soil or seed starter will not work. These mixtures don’t provide the fibrous properties required to maintain the structural integrity of the block. At Mountain Momma Organics we use a mix developed by Elliot Coleman composed of:
|
30 units of brown peat
|
¼ unit colloidal phosphate
|
|
20 units compost
|
¼ unit of blood meal
|
|
20 units coarse sand or perlite
|
¼ unit greensand
|
|
10 units garden soil
|
1/8 unit lime
|
The blood meal, colloidal phosphate, and greensand are used to create a basic fertilizer. We use certified organic constituents which can be a bit difficult to acquire. For your first batch we suggest a cup as your measuring unit. Thus, 30 cups of brown peat, 20 cups of compost, etc., will give you about a 5 gallon pail of dry mix. At our farm we use a gallon sized bucket as our unit of measure which of course makes a lot more mix. This is needed since we produce about 10,000 seedlings each year. Mix all these dry ingredients very thoroughly in a container large enough to accommodate mixing in a single batch. Let’s now move on to making soil blocks.
Block making: To form soil blocks the mix needs to be completely saturated with water. To achieve this we place three coffee cans of dry block mix from our large vat and 1 coffee can of fresh water in a dish washing sized pan, an approximate 3:1 ratio, and mix thoroughly. You should see a bit of standing water on top of the soil mix if it’s wet enough. You can see how saturated the mix is in Figure 2. The depth of the mix needs to be deeper than the blocks to be formed. We dip our block former in a water bath and then press it firmly into the mix and give a twisting action. The filled former is then placed on the flat tray where we want to form the blocks. Blocks are then ejected from the block former and onto the flat bottom tray by firmly pressing down on the block former’s spring loaded handle. I find that pressing down firmly on the positioned former before ejecting really helps to compress the blocks and keeps them well formed. Some experimentation with the moisture level may be required to achieve consistent formed blocks. Dip the block former into the water bath between each use. It’s easy to place the new blocks right up against the ones you’ve already formed. You’ll quickly develop a rhythm and see that you can very efficiently make a full tray of blocks in minutes. Now wasn’t that really fun? I think block making is the part to do with children. Soil blocks that “accidently” fall apart simply get tossed back into the container and reformed. Voila, no mess, no stress!
Seeding the Soil Blocks: Earlier we talked about the pin that forms the dimple at the top of the soil block. If you look closely at Figures 1 and 2 you’ll see the dimple on the top of the formed soil blocks. This is where you’ll gently place each seed. It’s tempting to put multiple seeds onto the soil block, but, as we described earlier, germination rates are very high with soil blocks so there’s really no need to do this and it’s typically detrimental. There are many tricks to placing a single seed. Tapping just one out of the seed package will definitely not work, especially with very small seeds. My favorite trick is to use a wet toothpick. I put the tip of the toothpick in water and then touch it to a seed on a flat dish. This typically assures a single seed is picked up. There are exceptions to putting one seed per dimple, but we won’t cover those here. Do not cover the seeds with soil. Covering the seeds with even a little soil will reduce the germination rate. Finally cover the tray of seeded soil blocks with a sheet of black plastic to block sunlight and reduce moisture loss. Maintain an ambient temperature of around 75 degrees.
Germination: Use a hand mister and gently mist the seeds at least twice daily to maintain a high moisture level during the germination process. Germination typically takes a few days. After most of the seeds have sprouted, remove the dark plastic covering and place the tray in partial (indirect) sunlight. Water young seedling extremely gently to maintain a high moisture content in the blocks. We typically water twice a day and make sure the blocks are saturated each time. By design the blocks will only take up as much water as they can hold, so there’s little concern for overwatering. It’s important to not erode the blocks or damage the young seedlings when watering. We use a super-fine ½ GPM nozzle manufactured by Fogg-it that fits directly onto our wand or garden hose.
Preparations for Transplanting: After your seedlings have become healthy young plants you can “harden them off” before transplanting into  the full sun. Hardening off is achieved by exposing the seedlings to direct sunlight and breezes for several hours each day for a few days. The plants should be well watered before and after setting them out in the direct sunlight. Plants should not be excessively overgrown and should be transplanted before roots have a chance to cross between soil blocks.
the full sun. Hardening off is achieved by exposing the seedlings to direct sunlight and breezes for several hours each day for a few days. The plants should be well watered before and after setting them out in the direct sunlight. Plants should not be excessively overgrown and should be transplanted before roots have a chance to cross between soil blocks.
Transplanting: Finally, it’s transplant day! The soils blocks should be well watered before transplanting. A hole should be made in the soil that will accommodate the full depth of the soil block and locate its top surface just slightly below ground level. Soil contacts around the planted soil block are important, but avoid compacting the soil. Then water in you seedlings and your well on your way to having vibrant plants.
I hope this article inspires a few readers to give soil blocks a try. You can learn more by googling “soil blocks” on the internet or you might want to pick up a copy of Elliot Coleman’s book, “The New Organic Grower”, 1995, Chelsea Green Publishing Company. You’re also welcome to visit us, Mountain Momma Organics, at the Bridgeport Farmer’s Market. We’re happy to share further ideas and techniques with you.
Until next month, Stay Fresh!
The Bridgeport Farmers Market Association is the seven member all volunteer board of directors that governs the Bridgeport Farmers Market. It is supported by a wonderful group of community volunteers who help in the setup and maintenance of the market. For more information on the Farmers Market or to see how you can help please e-mail us at bridgeportfarmersmarket@yahoo.comor, better yet, LIKE us on Facebook or follow us on Twitter. You can also check out the Market’s own YouTube channel: http://www.youtube.com/user/BridgeportFarmersMktor for more BFM video content you can now go to http://vimeo.com/bridgeportfarmersmarket/videos